via a PUT request to a presigned URL
There are several ways of uploading files to AWS S3, and I’ve used different methods in the past (which I no longer remember). This article talks about using presigned URLs — which I’ve recently just read about and chosen to adopt in a project (in Node.JS).
Step 1: Create an S3 bucket
Go to Amazon S3, click on Create bucket.
Under General configuration, take note of the AWS Region that you choose here, and give a Bucket name to your new bucket.
Under Block Public Access settings, uncheck Block all public access.
You can leave all other settings as default, unless otherwise required.
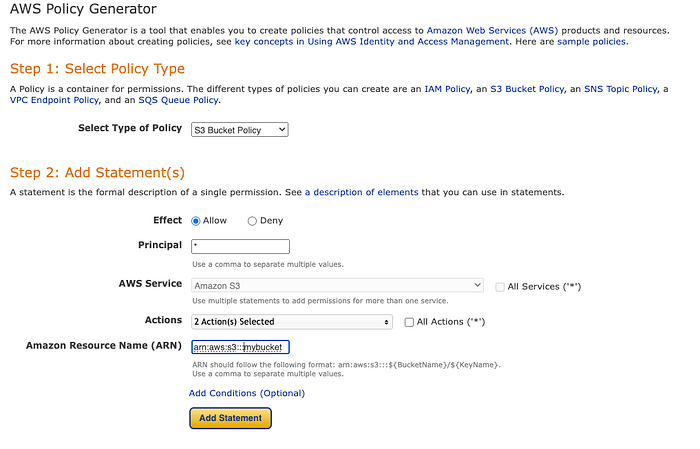
When your bucket is created, click on it and go to Permissions tab. Create a Bucket policy using the AWS Policy Generator using the following parameters, with the actions getObject and putObject:

The generated policy will look something as follows (please do not copy the following but create your own as described above, as I’ve removed the ids):
{
  "Id": "xxxx",
  "Version": "2012-10-17",
  "Statement": [
    {
      "Sid": "xxxx",
      "Action": [
        "s3:GetObject",
        "s3:PutObject"
      ],
      "Effect": "Allow",
      "Resource": "arn:aws:s3:::mybucket",
      "Principal": "*"
    }
  ]
}
Step 2: Create a Lambda function
There are a few reasons why I chose to implement the getPresignedURL method via AWS Lambda:
1) It comes with the AWS SDK — and it is much easier to create the presigned url through the SDK than trying to compute our own,
2) I can create a function URL with it, that allows me to call it like a normal API.
To create our Lambda getPresignedURL:
Go to AWS Lambda > Functions.
Click Create function and select Author from scratch.
Enter a function name and select a Runtime as Node.js 20.x.
Leave the other settings as default and click Create function.
Copy the following code into the Code tab:
import { PutObjectCommand, S3Client } from '@aws-sdk/client-s3';
import {
  getSignedUrl,
} from "@aws-sdk/s3-request-presigner";
import crypto from 'crypto';

const REGION = 'your-region'; // update this
const BUCKET = 'your-bucket'; // update this
const rawBytes = crypto.randomBytes(16);
const KEY = rawBytes.toString('hex'); // this gives your file a random name

const createPresignedUrlWithClient = ({ region, bucket, key }) => {
  const client = new S3Client({ region });
  const command = new PutObjectCommand({ Bucket: bucket, Key: key });
  return getSignedUrl(client, command, { expiresIn: 3600 });
};

export const handler = async (event) => {
    try {
        const clientUrl = await createPresignedUrlWithClient({
          region: REGION,
          bucket: BUCKET,
          key: KEY,
        });

        return clientUrl;
    }
    catch (err) {
        console.error(err);
    }
};
Click Deploy.
Click the blue Test button and Configure a test event: Select Create new event, give an event name and an empty event JSON. Click Save.
Click Test. You should see a presigned URL generated in the following format: https://[bucketname].s3.[region]/xxxxxxxxxx
Now we need to make the Lambda function accessible with a Function URL:
Go to Configuration tab, select Function URL.
Click Create function URL. Under Auth type, I am choosing NONE for my use case.
If you will access your function from another origin, open the Additional settings tab and click Configure cross-origin resource sharing (CORS).
Click Save.
You should see a Function URL in the Function Overview section now. Click on it, and your browser should open a new tab with the presigned URL displayed on the screen.
Step 3: Test with Postman (optional)
Copy and paste the presigned URL into Postman, select PUT as the method.
Under Body, select binary and choose a test file to upload.
Click Send. You should see the file uploaded into S3.
Step 4: Upload image via the Presigned URL
There are many ways to upload the image, and one of the most basic methods in Javascript is via XMLHttpRequest:
var xhr = new XMLHttpRequest();
xhr.open("PUT", presignedURL, true);
xhr.onload = function () {

if (xhr.readyState == 4 && xhr.status == "200") {
    // successful upload - do whatever, like updating a DB

}

let body = document.querySelector('#image_input').files[0]
xhr.send(body);
And that’s it! I hope the article had been useful for you. There are more intricacies of using AWS like setting up IAM access etc., my solution is just the most basic form. Please drop a comment if I’ve made any mistakes.
Once again, thank you for reading my article! You might want to check out some other related articles here:
